Introduction
Writing blogs is a great way to add regular, fresh content to your website. It's also really powerful from an SEO perspective.
The good news is that it's super easy with our CMS!
Blogs help to attract the right visitors to your site. If your article covers a question that a person is looking for online, you increase your chances of appearing in search results due to the relevance of the content. For this, keywords are essential. We go into a bit more detail in our 'What is Keyword Research?' blog.
Stuck for ideas on what to write about? Why not check out our blog on 'Blog Topic Ideas' for inspiration?
We hope this 'How To' guide is helpful, but if you have any further questions, feel free to contact us at support@estateapps.co.uk.
Creating a blog
Whether you're completely new to this, or just need a little refresh, this article will allow you to add all your blog content by yourself.
Step 1 - Logging in
Firstly, you will need to log in to the CMS using your login that you should have been able to set up with us already (please get in touch with our support team if you have any issues with this).
- On the left-hand side, there will be a menu bar. Click the 'Content' menu.
Step 2 - Creating a new blog article
Then, under 'Content' will be 'Blog Articles', where you will find access to all of your blogs, as well as add any new ones.
- Click the blue 'Create' button on the far right to add a new blog.


From here, you will be directed to the 'Create Blog Article' page. The next steps will help detail each section with an explanation for each field.
Adding a title
This is a mandatory field, indicated by the red asterisk.
The title is your article headline so it would need to be as descriptive as possible but in as few characters as possible.

The 'Image Alt Tag' and 'Meta Page Title' fields are automatically copied from the Title, but cut down to fit within a 30 character limit.

You can change these though, if you like.
Metadata
As mentioned in the previous 'Adding a title' section, the Title will be automatically copied to the 'Meta Page Title'.
This is generally good practice (SEO) so we do it for you but you can, of course, change it if you wish.
The “Meta Page Description” field should just contain the first couple of sentences of the article itself. This will also fill out automatically. You may need to edit this if the field contains too many characters, but simply deleting the last sentence, for example, will sort this issue.

Assigning an author
This field isn't mandatory, but we recommend entering one because it gives a more personal feel to the blog or enables you to credit external guest writers (for example).
To assign an author:
- Click the 'Author' field.
- Assuming you have already added one or more authors (please find how to do this here, if you do not already have authors added), there will be a drop-down menu, indicated by the small triangle on the right end of the box.
- Click the drop-down menu, and click whichever author applies, then that name will show in the 'Author' box.

Adding tags
The 'Tags' field operates similarly to the 'Author' field, in the way that it is not mandatory, and it has a drop-down menu (once tags have been added).
Tags are useful to categorise your blogs. For example, you can add blogs to your 'Success Stories' page (see here for more info on this).
The tags are important for SEO going forward. Relate to the article itself in terms of what keywords you’d use to find it. Don’t go overboard though, think about how you’d like to categorise your articles and use those as tags (so for example, 'Community', 'Sales', 'Lettings', 'Legal' etc). You don't want to end up with 20 tags because that will look a bit of a mess on the website itself!
To add a tag:
- Click on the 'Tags' field.
- Type the tag you would like to add (eg. success-story, careers, faq)
- Press 'Enter' and the tag should appear in a light blue box inside the 'Tags' field.
- From here, you should be able to see the tag in the drop-down menu, so you can add it to future blogs.
- Repeat this for all tags you would like to add.

You can add more than one tag to each blog!Blog statuses
The Status of your blog can be a Draft (saved to the CMS but not shown on your website), or Published (saved to the CMS and shown on your website).
There are other statuses listed in the drop-down menu, but these two are the basic and most used ones.

Adding a date (to auto-publish an article on a certain date in future)
If you would like your blog to be published on a particular day, you can schedule it to be uploaded in the future in the 'Publish Date' field.
To add a publish date:
- Ensure the status is set to "Pending".
- Click the 'Publish Date' box to manually add a date (in the format - dd/mm/yy).
- Alternatively, you can click on the calendar icon to the right of the box and select a date from the calendar for any day in the future.
 The blog will then automatically switch to the “Published” status when it reaches the date specified so this enables you to schedule articles in advance.
Adding a featured image
This image is shown on the main “Blog” page but also, across the top of the page within the main “article” page.
Any image should be in landscape format and around 1600px in width (the height won’t matter). You can use any image editing software for this.
To add an image:
- Under the 'Image' field there is a space where you can drag and drop, or click to upload an image from your computer.
- Click this area, and your files should pop up. Then select the image for your blog.
- Alternatively, drag and drop the image from your files or your screen.
- You should then see the image load and appear under the image field.

Before uploading the image, we recommend using this tool - https://tinypng.com/

This enables you to optimise the file to keep it lean and quick-loading.
Adding blog content
Applying basic formatting
Be wary of using different fonts to signify header text etc. The problem is, that changing the font from the default font of the site can cause the text to scramble and not look right on the site page. You may want to keep the default font/size throughout and use bold / underline if necessary.
You will also need to avoid copying/pasting text directly from a Word Doc as this includes hidden text formatting and code. Instead, copy the text into a simple notepad or text file, then copy/paste it into the CMS.
We also have the options of different sized pre-set headings (shown as ‘Heading 1’, ‘Heading 2’, etc under 'Format') which can be used, but you may need to ensure that the headings are the same on each page (blogs as well as other site pages) if you’d like a consistent look on the site.

Adding text links
- You can make any text within the multi-line text field into a link by simply highlighting it and then clicking the “chain-link” icon in the toolbar.
- Then you can copy/paste the URL into the box (labelled URL!) and click the green 'OK' button.
Any links need to be entered with the “Target” of “New Window (_blank)” which essentially means that when people click on the link, they are taken to the URL in a new browser window (thereby leaving them on your own website). This is hugely important because you don’t want users to be taken to another site and leave yours behind.
Tip: We recommend avoiding linking to external sites wherever possible because you don't have any control over whether or not they will remain active in future. Linking to dead pages can be bad for your website's SEO.

Adding downloadable files
Before doing anything, we'd first recommend running your PDF through this site - https://www.ilovepdf.com/compress_pdf - which optimises the file making it quicker to load.
- You can make any text within the multi-line text field into a link that loads a PDF by simply highlighting it and then clicking the “chain-link” icon in the toolbar.
- Within the prompt, you’ll notice an “Upload” tab - this is the one you need
- Use the “Choose file” field to select the PDF
- Then click the “Send it to the server” button to upload it.
Any links need to be entered with the “Target” or “New Window (_blank)” which essentially means that when people click on the link, they are taken to the URL in a new browser window (thereby leaving them on your own Website).

Adding embedded content
Embedding photos
- The "Embed Image" feature is the 3rd icon from the “chain-link” one mentioned above and has the word "Image" shown in tooltip text (i.e. when you hover over any of the icons, you will see tooltip text appear).
- First, ensure your mouse cursor is positioned in the text field where you want the image to appear.
- Then click the "Embed Image" icon.
- You'll see a prompt appear with 3 tabs. Just click the "Upload" tab, then click "Choose file" to select the image off your computer.
- When it's selected, click "Send it to the Server".
- Then click the green "OK" button at the bottom of the prompt.
You should see your embedded image appear as a placeholder inside the text field (you might need to adjust the text above/below it to ensure it's nicely spaced out).


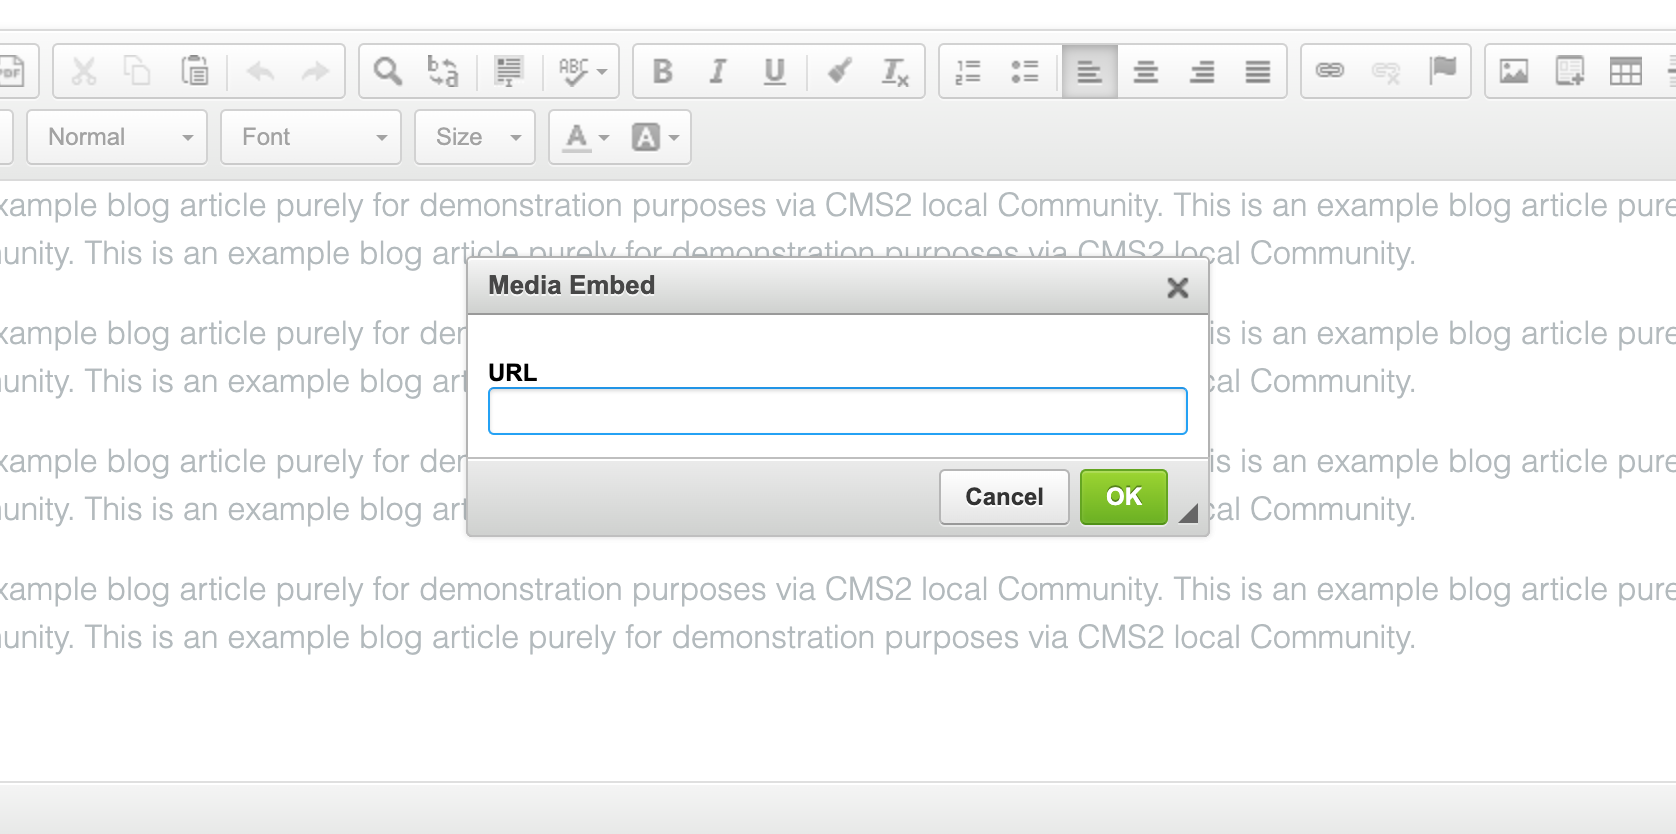
Embedding video
This is a similar approach as above. The "Insert Media Embed" icon is directly next to “Embed Image” icon.
- First, ensure your mouse cursor is positioned in the text field where you want the video to be embedded.
- Then click the "Insert Media Embed" icon.
- You'll see a prompt appear with 1 text field. Just enter the URL to your video from either YouTube or Vimeo and click the green "OK" button at the bottom of the prompt.
You should see your embedded video appear as a placeholder inside the text field (you might need to adjust the text above/below it to ensure it's nicely spaced out).

You can also embed posts from Instagram, Twitter or Facebook by copying the URL and pasting it into the 'Media Embed' URL field.
Editing a blog
If you need to edit one of the blogs that you have already published or edit a blog that is in your Drafts this is the section for you!
To edit your blog(s):
- Firstly, you will need to log in to the CMS using your login that you should have been able to set up with us already.
- On the left-hand side, there will be a menu bar. Click the 'Content' menu.
- Then, under 'Content' will be 'Blog Articles' which is where you will be able to access all of your blogs.
- Next, click on the blog that you would like to edit - using the blue pencil icon to the right.
- This will take you back to where you add all of your content (Title, images, text, etc...). From here simply edit whichever area of your blog you need to - using all the information above to guide you, if necessary.


Deleting a blog
- Firstly, you will need to log in to the CMS using your login that you should have been able to set up with us already.
- On the left-hand side, there will be a menu bar. Click the 'Content' menu.
- Then, under 'Content' will be 'Blog Articles' which is where you will be able to access all of your blogs.
- Next, click on the blog that you would like to delete - using the blue pencil icon to the right.
- This will take you back into where you add all of your content (Title, images, text, etc...).
- From here, scroll to the bottom of the blog where there are 3 buttons - 'Save', 'Delete' and 'Cancel' (there will also be a 'Publish' button if the blog is not yet published)
- Click the red 'Delete' button. Then, when the confirmation screen pops up, click 'Yes'

Was this article helpful?
That’s Great!
Thank you for your feedback
Sorry! We couldn't be helpful
Thank you for your feedback
Feedback sent
We appreciate your effort and will try to fix the article